Wednesday, December 23, 2015

How to prevent iPhone 5 motherboard failures

It is easy to replace a iPhone 5 LCD screen assembly. It won’t be hard for a newbie to successfully replace the screen after watching a detail tutorial on youtube. However, problems not related to LCD screen may sometimes be a headache to technician, even experienced repair savvy. Here are some common issues we can summarise, which we should aware and prevent.
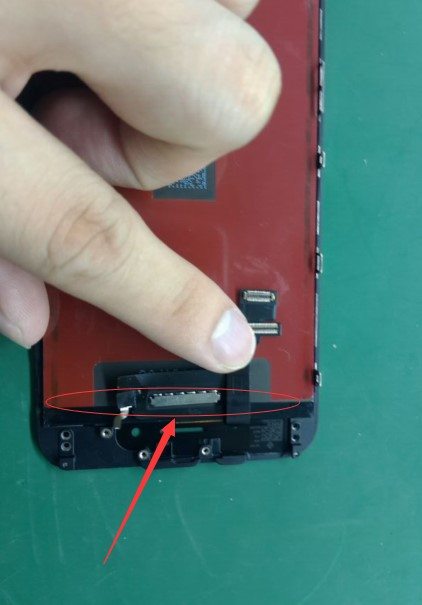
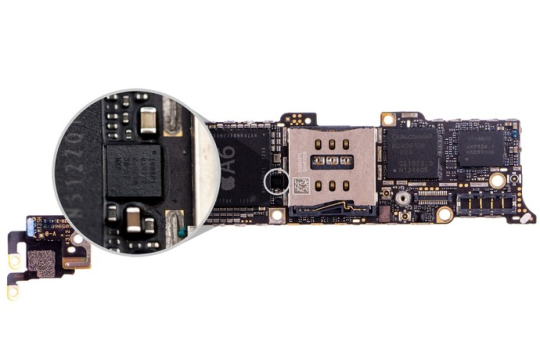
LCD screen assembly connector


image


image

When you remove the iPhone 5 LCD screen, you should pay extra attention to the tiny components next to the connector. if the small part is damaged, the LCD screen is not going to display anything. Meanwhile, a geomagnetic sensor at 2 o’clock director should be taken extreme care otherwise your device is not going to load the system and warning will be displayed on the screen.
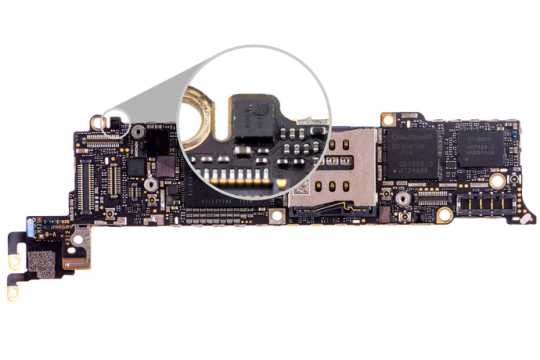
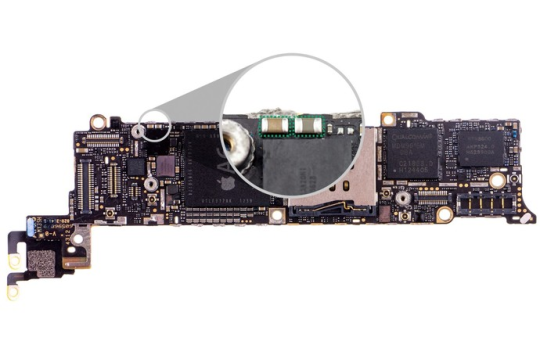
Baseband Chip


image

Don’t crack the baseband chip when you remove the RF antenna connector to prevent mobile communication malfunctioning.
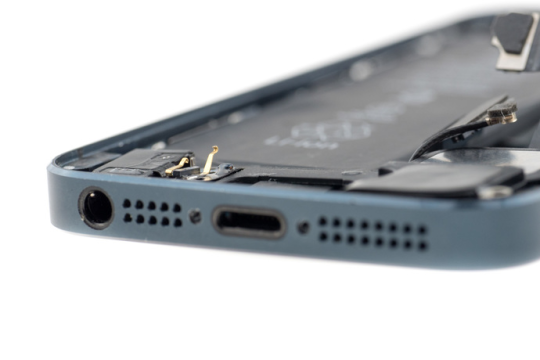
USB Control Chip


image

USB control chip need to be replaced if your iphone 5 device get charged too frequently or you dry joint the chip on CPU during the repair.
Wi-Fi issue related to Chip Short Circuit


image

Short circuit results when your iPhone 5 device drop into water.
Home Button Issue


image

It will be malfunctioned if the gold contact on home button are bad or the lightning port is damaged. Simply correct the gold contact or replace the lightning port.

Monday, December 21, 2015

Troubleshooting the Samsung Galaxy S3 Touch Screen Digitiser and Replacement Assembly


Installing Samsung Galaxy S3 touch screen digitiser is not easy and even though a repair savvy would be 100% guarantee they can install without issues. However, our customer service specialists have summarised a few solutions for common problems:


  1. If you encounter white or black display, let’s try to perform a soft reset on your device. 
  2. If soft reset dosen’t help, you can back to square one and plug the original to your main board again and see if it still works. If neither of your screen works, sorry that the problem may not be simply related the the screen. 
  3. If you find blotches on your screen, that may be due to too much pressure on the screen during installation. Open your device again and make sure none of your internal components are causing the pressure.
  4. If you find lines down your display or only part of touch functions work, sorry that you may break your screen again during the installation.

Wednesday, December 9, 2015

Can I replace the iPhone 5 or 6 home button assembly with new Touch ID sensor?

The answer is: “Impossible!!!”. Apple iPhone touch ID sensor is designed to be secure and uniquely paired with each logic board already. You are not able to extract the cipher from the senior. If you replace the sensor or damage it already, you will lose your Touch ID forever.

Tuesday, December 8, 2015

What should I do if vertical line appeared on my iPhone screen after the replacement is done?

Blue vertical lines or stripes may be encountered when you finish the screenreplacement installation. It is common but it is not due to a defective parts. The reason and solution may be summarised as below:
1. Bad Connection
First thing you have to do is to check whether there is any dust or debris in between the flex cables and the motherboard. Try to clear them with a brush or cloth dipped with alcohol. Reconnect the cables to the logic board and make sure it is properly connected with a “click” sound. Do not force the connector together until they are properly lined up. If the flex cable is damaged, i.e. it is bent over 90 degrees, I am sorry to tell you that you have to buy a newreplacement again.
2. Static Charge
Electro-static Discharge accounts for the vertical lines too. statics is produced by the human when you are conducting the installation. So, you can reduce any statics by wearing a anti-static bracelet and keeping an ion fan during the repair or if you don’t have the bracelet, you can wear a surgery glove and make sure you are touching the ground when you are performing the task.
3. If both 1 and 2 cannot solve your problem, then may be the IC on the display is damaged already. Check the top left and top right corners and see if there is any damage.

Myths behind Apple iPhone Screen Replacement Assembly Parts

Many technicians wonder whether the screens they are sourcing for repairing are genuine or not. Here are some insiders information in this market:
  1. You are impossible to get a 100% new and original screen assembly as they should all goes to Apple. All those so called 100% genuine screens are detached from original iPhone. Detaching from iPhone means they are genuine but not 100% brand new.
  2. LCD panels actually are supplied by LG/Sharp/Toshiba and they are authorised LCD manufacturer but they actually are not allow to sell iPhone LCD panel directly to wholesalers in the market because it is a violation to their agreement with Apple. Apple QC teams has a very strict QC standard on LCD quality and those QC failed batch will be rejected by Apple but the question is whether these manufacturers will indeed destroy them? Surely they won’t. They will still produce those assembly and sell to the China parallel trader in Shenzhen China.
  3. If you are not professional person, it is difficult for you to distinguish genuine and OEM by colour display, brightness and contrast.
  4. Those good quality screen replacement are produced with these LCD panes from LG/Sharp/Toshiba, however, the glass panel, bezel and digitisers  are not 100% genuine.
  5. Genuine or not can be distinguished by checking whether there is a Apple logos on the the flex cables attached to the digitiser. However, due to China legislation, manufacturers will choose to scribble out the logos to prevent any lawsuit.
  6. Also, flex cables from genuine screens are often softer and more flexible in order to make sure it will not break during the installation.
  7. Usually, the OEM LCD glass has a special coating on its surface so that any water drops should be rolling off easily on the surface.
For more questions, you can contactwww.cellphoneage.com

Wednesday, December 2, 2015

Black Screen After iPhone 6 Screen Replacement

Somebody may encounter black screen after iPhone 6 screen get replaced even the phone is connected to power. Everything fine, phone vibrates when connected to iTunes. There may be 2 reasons:

  1. You bought a poor quality iPhone 6 screen assembly. You should carefully choose the assembly from experienced supplier. Browse here.
  2. Your replacement assembly does work but you have trouble on the backlight. Check if you still be able to see the logo with enough light by holding your phone under a lamp. If so, check the back light filters FL2025, FL2024 and FL2026 and replace it if you find any sign of damage. you can find them out around display connector near BS2503


If you want to source those components, you can live chat with our fanatical CS at www.cellphoneage.com

Can I replace Samsung Note 3 front glass myself?

Yes, you can as long as you have a set of special tools as well as professional skill. Otherwise, it is better, easier and safe to replace with the complete Samsung Note 3 screen assembly rather than just the glass because the front glass, screen digitiser and LCD screen are bind together tightly by strong adhesive.

Friday, November 20, 2015

What do you do if you got a broken iPhone Screen?

I know you are upset when your expensive iPhone screen is broken. However, it is fixable. If you are handy, you can simply buy a iPhone 5 / 6 LCD screen replacement parts, directly from a pro. We suggest www.cellphoneage.com since they are experienced in repair components supply. 


If you are not handy person, we will suggest you to go for a savvy. Google iPhone screen repair and you should find somebody pro around your location. For more information on the screen parts, you can browse here.

Thursday, November 19, 2015

How to install iPhone 6 Screen?

According to iPhone 6 distribution figures, more than 85 million users are using iPhone 6. The figure is impressive and that means the demand for broken screen repairing is huge. Repairing your iPhone 6 broken screen costs you a lot in Apple store. Even though you just broke a outer glass panel without any LED display issue, Apple will charge you 250 USD. As a result, many people turns to eBay and Amazon and get a screen replacement for DIY. However, quality differs in eBay and most people are not savvy to distinguish the quality. As a result, we suggest you to buy from us, as we are one of the expertise, with 8 years experience in this phone repair component market, with support of factory in China. With factory support in China means a lot because all smartphones nowadays are made in China and have direct supply from China means we can access quality but bargaining price parts. If you don’t know how to distinguish screen quality, our local technical in San Francisco is happy to teach you.

To install a new iPhone 6 screen assembly part, make sure the installation tools are ready. Power off your iPhone 6 phone and remove your SIM card. Unscrew the two screws at the bottom of the fuselage.

Due to iPhone 6 one body design, it is difficult to disassemble and it requires the use of suction cup. There is a flex cable connecting to the motherboard on the top of the screen, next to camera position and so please pay extra attention not to break the it when you dismantle the wire between the LCD and motherboard. Don’t tear it and do it gently.

The flex cable is fixed on the motherboard by a metal shield and you need to disassemble the shield in order to remove it. After all, you can install your new screen on it and meanwhile, you have to make sure do’t tear or twist the flex cable when you plug the new iPhone 6 LCD assembly to the motherboard.

Make sure you turn on the iPhone 6 and check the touch screen response in order to make sure it is properly installed and whether the iPhone digitiser functions normally. Take a white colour screen, grey colour screen to check if there is any obvious dead pixels or dust on the screen.


If you have any question, please go to www.cellphoneage.com We are looking forward to serving you.

Tutorial for disassemble and assemble iPhone 5S Screen

Make sure you should power off your iPhone 5s before starting the repair work.


1. Use the provided screw driver from your purchased LCD screen assembly and unscrew the plum blossom screws at the bottom.


2. Lift the screen with sucker but remember to pay attention of the home button since the touch ID fingerprint sensor has a wire connected to the motherboard.


3. Remove the wire which connects the touch ID to the motherboard by the pry tool. Pry the metal cover on the outer of touch ID connector with the pointed part of the knife.

4. Pry the touch ID.
5. Screen flex cables are under the metal cover, we need to disassemble cover in order to detach the screen with a cross screw driver.

6. Pry the 2 flex cables shown in the picture with the flat head part of the knife.


7. Pay attention not to lose the screws after it was just dissembled.

8. Transfer the Touch ID sensor and home button to the new assembly


9. Unscrew the screws in the circle of the image with a cross screwdriver. You will find a small metal below it and pay attention to to which side the metal should face while the metal should press the wire.

Use your finger to hold the wire, you can uncover the small metal slowly with another hand. You can recognise a big metal piece protecting the home button.

10. Unscrew the 2 screws and uncover the large metal.

11. Pry the home button out carefully because the home button was secured with adhesive. Pay attention and special care to the flex cables which connect the touch ID.
You can separate the home button with Touch ID sensor from the damaged screen ,then install the home button to the new screen.

12. To transfer the receiver, a front-facing camera, heat sink to the new LCD screen, unscrew below 3 screws. 2 of them on the left are used to fix the earpiece speaker and bracket, while the one on the right is to fix the heat sink at the back of screen.

Take the receiver components out, please note that there is a mosaic fixed on both side. To lift the components, we need to bend the components outward slightly to void break off.

13. The assembly line of front-facing camera was folded up under the border, assemble the line carefully and pull it from the border slowly.

14. Under the receiver, pry the wires at the right of screen. Don't break the wires which close to sensor.

15. Then unscrew the 4 screws in the picture.

16. Then you can take the heat sink and front-facing camera out together. There is a adhesive stuck the heat sink and wire of camera together.

Install the heat sink ,receiver components and front-facing camera to the new screen.
17. Put the new screen to the phone with force.
18. Screw the two screws.


Tuesday, November 17, 2015

How to distinguish iPhone Screen Quality


Quality of iPhone screen replacement assembly differs in the market. Here are the tips to distinguish good quality from bad one:


  1. Quality iPhone screen assembly has hydro-phobic coating. If you put a water droplets on it, it will not spare. 
  2. Quality iPhone screen assembly should comes with long lasting flex cables while the cheap ones are wrinkle and will break easily. 
  3. Quality screens displays original colour regardless of viewing angle while poor quality looks dark and yellow. 
  4. Good ones assembled with good techniques and high precision machines, so you won’t find any gaps in between. 


To get a hassle free purchase, the most important point is to source from a experienced and professional after-service suppliers. Visit www.cellphoneage.com no matter you are doing DIY or sourcing for wholesale to support your repairing business.

Difference between OEM and Non-OEM iPhone Screen Replacement Parts


iPhone screen replacement parts are in huge demand due to the popularity of iPhone series. Many sellers claim their parts are OEM, non-OEM, A+ quality but how many people actually know how to distinguish the difference?

Actually the major supply of these parts are sourced from Shenzhen China and the screen replacements can be categorised into two major areas. They are OEM and non-OEM. non-OEM stocks can be further categorised into A, B, and grade C stocks.

OEM iPhone Screen Replacement Parts

These screen replacement parts are made with LCD from LG, Sharp or Foxconn. Quality is good, IC chips and flex cables are original made. The screen can be distinguished by its vivid color display and color contrast.

Non-OEM iPhone Screen Replacement Parts

Currently the largest supply in the second hand phone market. To understand what is the non-OEM iPhone screen replacement assembly, let us firstly explain the assembly design. Actually the iPhone 4 screen assembly is comprised of glass panel, screen digitiser and LCD. iPhone 5, 6, 6S screen assembly are comprised of glass panel and LCD with attached digitiser.

Non-OEM iPhone Screen replacements parts are made by detaching the broken glass panel iPhone. These iPhone LCD and digitiser are usually functional. They apply a new glass panel with machine under a dust free environment.


As a result, quality of non-OEM iPhone screen replacement parts may differ due to the adhesive production experience, glues they used. Non-OEM iPhone screen replacement parts can be divided into different grades. Grade A assembly parts quality is almost equivalent to original one and the difference is hard to be distinguished by human eyes. Grade B assembly parts may have 2 to 3 tiny dead pixels and only can be discovered by experienced QC specialist. Grade C or D screen parts are the worse quality among those as backlit, big dead pixels or lines are common. IC chips instability and poor post-installation results in lines and backlit respectively.