Tuesday, May 31, 2016

How to Replace a Apple iPhone 6s Plus LCD Screen Assembly


It is a bit disappointing that Apple doesn’t not introduce the replacement of Corning Gorilla glass with Sapphire glass. If you once again shatter your iPhone 6s LCD and you have to move into consideration whether you should buy a new phone or replace a new screen by a repair tech or yourself if you didn’t subscribe any Apple Care plan.
Once again, please don’t consider to replace your iPhone 6s LCD if you are not confident or you don’t think you are a handy person since replacing a iPhone 6s LCD assembly needs extreme care since a 3D touch layer is introduced and any careless mistake will damage the 3D touch feature.

Step 1
Power off your iPhone 6s.


Step 2
Remove the 2 screws underneath. Apply heat to four sides of screen in order to soften the adhesive before we detach the assembly.


Step 3
Open a small gap between the LCD assembly and body by the suction cup and case opening tool.
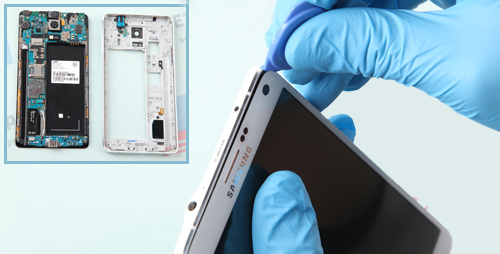


Step 4
Flip open the iPhone 6s LCD screen assembly slowly.
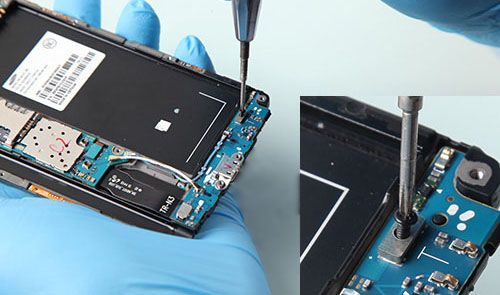


Step 5
Remove the metal shield which covers the flex cables by taking off the 5 screw, as the picture shown.


Step 6
Detach the front facing camera flex cable, 3D touch flex cable and LCD digitizer flex cable.


Step 7
Remove the home button bracket by taking off the two Philips head screws.


Step 8
Detach the home button connector and remove the home button by apply heat on it in order to loosing the adhesive.


Step 9
Remove the front camera metal shield by taking off that 3 screws.


Step 10
Apply heat to the front facing camera with sensors cable in order to remove the ear piece.


Step 11
Undo the 8 Philips head screws holding the metal plate.


Step 12
Take off the home button connector cable.


Step 13
Heat up the 3D touch layer edges and pry up the layer with extreme care.


Step 14
Reverse all the step above and reinstall all the components back to the body.


Wednesday, May 25, 2016

How to Replace a Samsung Galaxy Note 4 LCD Screen


If anybody who shatters his or her Samsung Galaxy Note 4 LCD screen, no worry. There are a few options you can consider. Either you can turn to a Samsung Warranty or you can replace a new screen. We suggested not to repair the Samsung Galaxy Note 4 yourself unless you are indeed an experienced phone repair techs. If you insisted you are a DIY handy person, this guide is for you.

Step One

Power off the device
Pull out the S Pen Stylus
Pull the battery door out 


Step Two

Remove the Samsung Galaxy Note 4 battery from the body


Step Three

Remove the 16 screws in the rear housing
Widen the gap between the housing and body and remove the rear housing by case opening tool


Step Four

Pry up the 4 connectors
Remove the Screw
Remove the upper portion of logic board and pry up the flex connector with extreme care


Step Five

Remove the vibrating motor with power button flex cable
Remove the ear speaker with flex cable


Step Six

Pry up the 2 connectors
Remove the screw
Pry up the charging port assembly and then pry up the 2 connectors


Step Seven

Heat up the Samsung Galaxy Note 4 LCD Screen Replacement Assembly for 2-3 minutes in order to soften the adhesive in between and remove the middle plate by case opening tool


Step Eight

Adhere Samsung Galaxy Note 4 front housing adhesive to the middle plate and then connect the LCD screen flex cable and digitiser flex cable to the logic board


Step Nine

Put the vibrating motor with power button flex cable in the slot


Step Ten

Put the ear speaker with flex cable into the slot


Step Eleven

Put the logic board in the slot and connect the Galaxy Note 4 Charging Port Assembly to the board


Step Twelve

Connect the ear speaker with flex cable to the logic board


Step Thirteen

Connect the home button flex ribbon to the logic board


Step Fourteen

Connect 2 antennas to the mother boards


Step Fifteen

Fasten 1 screw in the charging port assembly


Step Sixteen

Fasten 1 screw in the mother board.


Step Seventeen

Cover the rear housing and fasten the original 16 screws you took off previously in the rear housing


Step Eighteen

Put the battery in and insert the stylus pen to the rear housing


Step Nineteen

Cover the battery cover and then you are done.


Tuesday, May 24, 2016

How to Replace Samsung Galaxy S6 Screen


Gorilla Glass 4 LCD screen is adapted by Samsung Galaxy S6 and S6 Edge and up to this moment, Gorilla Glass 4 is reportedly to be the hardest glass even. However, there would still be customers who shatter the Samsung Galaxy S6 LCD screen accidentally. However, we are highly recommend not to repair the Samsung Galaxy S6 or S6 Edge yourself unless you are indeed an experienced phone repair techs. If you insisted you are a DIY handy person, this guide is for you.

Step One 

Power off the Samsung Galaxy S6
Take out the SIM card tray by using a ejector pin


Step Two

Heat up the Samsung Galaxy S6 battery door
Pull up the battery cover with provided suction cup. Broaden the gap between the battery cover and body with a case opening tool.
Separate the battery door from the phone.


Step Three

Remove the 13 screws in the rear housing.
Heat up the LCD assembly
Release the rear housing from the LCD assembly by suction cup and case opening tool.
Handle carefully on the wireless charging chip on the battery


Step Four

Pry up the LCD assembly connector, front facing camera connector, battery connector, ear speaker connector and the home button flex ribbon connector.
Turn over the motherboard and unplug the usb charging assembly flex cable.


Step Five

Pry up the battery
Remove the front facing camera
Remove the ear speaker
Remove the vibrating motor


Step Six

Remove the bluetooth and Wi-Fi cables
Remove the earphone jack screw


Step Seven

Heat up the LCD assembly until the front housing is loose and fallen apart


Then you can start reverse the above steps and assembly the new Samsung Galaxy S6 LCD Screen to the frame with a fresh adhesive.